7 easy steps to custom inputs in shiny
A step by step guide on how to include custom inputs into R Shiny. This guide is going through an example of a custom input build from jQuery. After the tutorial you will be able to: Build your own front-end elements in shiny AND receive their values in R.
Why a second guide on building custom shiny inputs?
For more than two years we are developing one of the largest Shiny apps in the world. It’s large in terms of interaction items and lines of code. I already explained this in one of my former blog entries on how to write such an app. I used some techniques in Advanced R to build it.
Our customers wanted a lot of different custom inputs inside our app. They see a website on the internet and want exactly the same inside our shiny app. “Can we get this feature into the app?”. Upon this question I start reading the tutorial about custom inputs from RStudio again and often again. Don’t understand me wrong, it’s a great tutorial. But people tell me, they are missing the key message. I am missing a clear definition of steps you have to follow, to get your input ready to work.
For me it is sometimes really hard to reproduce what I did for one custom input in another custom input. This is the main reason why I am now creating this tutorial. There are key elements in implementing custom inputs that you shall think about. Some of them you will already be keen on, so you can ignore one or the other paragraph. But the one’s you do not know about, please read them carefully. And whenever you are building a new input, make sure you checked the 7 steps I will explain below.
The full outcome of this tutorial can be found in the github repository zappingseb/customshinyinput.
The final app runs at: https://sebastianwolf.shinyapps.io/customshinyinput/
What is important for a custom shiny input?
These are the chapters I will go through to build an app with custom shiny inputs and the things you need to know to do it yourself:
- Know how to find fancy and easy to implement inputs
- Know some basic HTML and JS for the setup
- Know how to start with the JavaScript InputBinding file
- Know what your getValue function looks like
- Know what your subscribe function looks like
- Know how to handle the input
- Don’t build reactive stuff about you input in R, do as much as possible in JavaScript
The example
My example is pretty artificial, but there is a reason for that. I want to make it hard to get the value of the input and use jQuery, because it has a lot of really cool features and is already included in shiny . So let’s imagine you want to define two colors. One is your bar border color, the other is your bar fill color. Both shall be entered using a color picker. Upon being too close (e.g. red and dark red) there shall be a little note on this. I will do this using the Telephones by region App from the Shiny Gallery because it includes a barplot. But let’s start from scratch
1 Know how to find fancy and easy to implement inputs
The app shall get two inputs that allow you to choose colors. Such inputs are called color pickers. This tutorial will deal with jQuery inputs. JQuery is easy to learn and already included in shiny. So let’s start searching for inputs by googling the following: “colorpicker jquery” .These are my results:
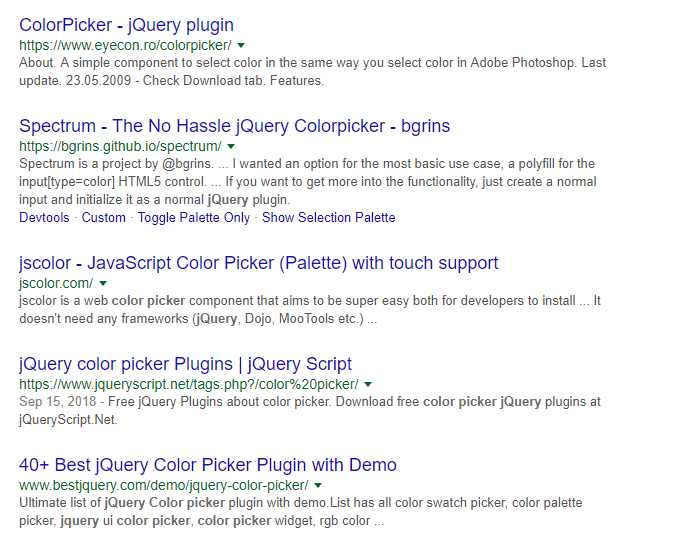 Results for googling jQuery colorpicker
Let’s double check the first two. The ColorPicker — jQuery plugin looks like that from the code description (https://www.eyecon.ro/colorpicker):
$('#colorpickerHolder').ColorPicker({flat: true});
or on the page “Implement”
$('input').ColorPicker(options);
The Spectrum color picker (https://bgrins.github.io/spectrum/) documentation looks like that from the code description:
<input type='text' id="custom" />
<script>
$("#custom").spectrum({
    color: "#f00"
});
</script>
You can already see a difference in documentation. While spectrum gives you the HTML element to use + the JavaScript code, ColorPicker leaves you with some pure JavaScript code. This is something you should be aware of. If you use the first one, you might have to find out what the HTML has to look like on your own.
Second of all you shall be aware that it might be hard to derive the value of the color picker. Later in this tutorial I will talk about the getValue function of R-Shiny custom elements. In this case it is actually kind of easy, as the inputs work as real input elements. input elements can be read in jQuery using
$('input').val()
So please try to always use custom inputs that can be designed as html <input> elements. Additionally if the input like for spectrum is just a basic <input type="text"> you can stick to shiny standard inputs in your code, meaning you can reuse something like the shiny function textinputas it also produces a <input type="text"> element, but covers additional features like a label.
So for reasons of simplicity and documentation I will use the spectrum.js color picker.
Takeaway #1: Search for jQuery based tools that provide HTML in their tutorials
2 Know some basic HTML and JS for the setup
This chapter is about the front-end setup of your custom input element. Therefore you need to know some basic HTML. First thing to know: what is a class and what is an ID. Please read this at the desired links on w3schools if you do not know the difference.
Your custom input shall have both. An ID to make it easy to use the spectrum.js, or any other JavaScript feature you will stumble upon. Most of such special input features use IDs. Additionally you shall use a class, to make it reproducible. You may want to have multiple of your custom input elements in your final shiny app. Therefore they shall all get one class to look the same or behave the same.
The element we want to build shall be a div element with a specific ID and two color pickers inside. From the spectrum.js website we know one color picker looks like this:
<input type='text' id="custom" />
<script>
$("#custom").spectrum({
    color: "#f00"
});
</script>
So the things we have to replace are:
Additionally I already mentioned a shiny::textInput also generates this code inside e.g.
shiny::textInput(inputId = "custom")
produces
<input type='text' id="custom" />
as one part of its code. Meaning we can build a shiny + spectrum.js input like this in R:
div(
  shiny::textInput(inputId = "custom"),
  HMTL("<script>
     $('#custom').spectrum({
       color: '#f00'
     });
   </script>"
  )
)
view rawcustom_inputs_lessonone_textInput.R hosted with ❤ by GitHub
Of course you do not want to hard code the word “custom” here. Using the glue-package we can generate a pretty nice id parser. Additionally wrapping our two textInputs inside a div function and use glue to also parse the JavaScript code inside. Finally we get a function that will generate an input element including two text inputs where one is shiny made and one is custom made by HTML code (see below). Additionally the necessary JavaScript code for spectrum.js is parsed underneath the elements. We use the value preferredFormat: 'hex' as we like to get hex color values in R as a return.
#' Function to return a DoubleColorPicker input
#' @param id (\code{character}) A web element ID, shall not contain dashes or underscores or colon
#' @param col_border (\code{character}) A hex code for the border color default value
#' @param col_fill (\code{character}) A hex code for the fill color default value
#' @return An \code{shiny::div} element with two color pickers
#' @author Sebastian Wolf \email{sebastian@@engel-wolf.com}
DoubleColorPickerInput <- function(id="fancycolorpicker", col_border = "#f00", col_fill="#00f"){

  # Return a div element of class "doubleclorpicker"
  div(
    id=id,
    class="doublecolorpicker",

    # Include two shiny textInputs
    textInput(inputId=glue("{id}-input-border"),label="Border Color",value = col_border),
    tags$label("Fill Color"),
    HTML(glue("<input type='text' id='{id}-input-fill' value='{col_fill}'/>")),

    # Include the Javascript code given by the spectrum.js website
    HTML(
      glue(
        "<script>
          $('#{id}-input-border').spectrum({{
            color: '{col_border}',
            preferredFormat: 'hex'
          }});
          $('#{id}-input-fill').spectrum({{
            color: '{col_fill}',
            preferredFormat: 'hex'
          }});
          </script>"

      )
    )# HTML
  )#div

}
view rawDoubleColorPickerInput.R hosted with ❤ by GitHub
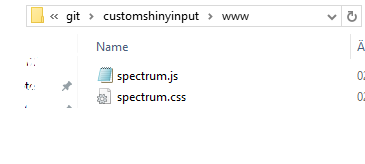 Placing the spectrum.js and spectrum.css files at the right place
Now inside your shiny app there are just two files missing. You can find both in the spectrum.js tutorial. You need to source the JS and CSS files. This is necessary for the app to work. Therefore you download spectrum.js from their website and place the “spectrum.js” and “spectrum.css” files in the “www” directory of your app (here “customshinyinput”).
Now you can source both files using the html sourcing procedures:
<script src='spectrum.js'></script>
<link rel='stylesheet' href='spectrum.css' />
In shiny it looks like this:
tags$head(
    tags$link(rel = "stylesheet", type = "text/css",
              href = "spectrum.css"),
    tags$script(src="spectrum.js")
)
The full app with finished user interface you can then create would include just your custom input in the UI:
library(shiny)
library(glue)

source("DoubleColorPickerInput.R")

ui <- fluidPage(

  tags$head(
    tags$link(rel = "stylesheet", type = "text/css", href = "spectrum.css"),
    tags$script(src="spectrum.js")
  ),

  # Generate a row with a sidebar
  sidebarLayout(

    # Define the sidebar with one custom input
    sidebarPanel(
      DoubleColorPickerInput()
    ),

    mainPanel(
    )

  )
)

server <- function(input, output) {

}
shinyApp(ui, server)
view rawcustom_inputs_lessonone.R hosted with ❤ by GitHub
and look like this:
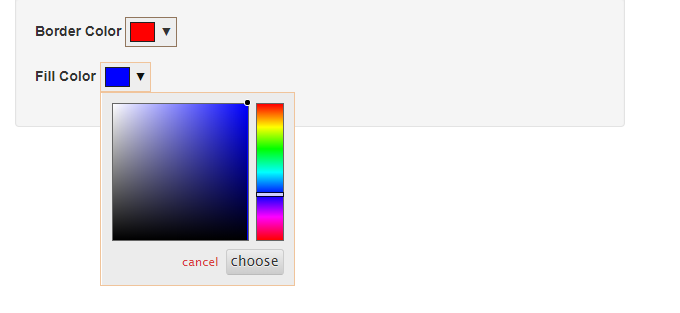 Image of custom_inputs_lessonone.R Shiny app
Now you can see that spectrum.js took over your shiny::textInput and made it a color picker input. This is not really a custom input. But you can already see it is a nice feature that you can have a simple text input that allows you to read colors.
Note: This is not a custom shiny input, as we do not receive the input values, yet. In the next chapter we will make it a real custom input.
Takeaway #2: Try to use Shiny Input Elements inside your custom elements.
Takeaway #3: Do not forget to source the JavaScript and CSS files of your custom element.
Takeaway #4: Put a div container around your element and give it a special class.
3 Know how to start with the JavaScript InputBinding file
The first step to make your input a real custom input is creating a JavaScript file as described in the tutorial by RStudio. It has to contain three main elements.
- The creation of your custom InputBinding
- The extension of your custom InputBinding
- The registration of your custom InputBinding
#1 and #3 are easy to do. Just give it a name and use the two functions
// #1
var DoubleColorPickerBinding = new Shiny.InputBinding();
// #3
Shiny.inputBindings.register(DoubleColorPickerBinding);
The hard part comes for Part #2. Part #2 shall contain 5 functions
- find
- getValue
- setValue
- subscribe
- unsubscribe
Let’s start with the find function. The find function allows you to call your custom input inside all other (2–5) functions by the el variable. This is pretty nice to work with, as you don’t have to find the element again and again and again. In our case we defined that each custom input shall have the HTML class doublecolorpicker . To find the element, we just use:
find: function(scope) {
    return $(scope).find(".doublecolorpicker");
 }
where scope is the website you are working on and find is a function that comes with jQuery and the . operator of CSS calls for classes. Do not mess up the two different find functions. One is defined inside your JavaScript file, the other one comes from jQuery. Now you’ve got it. You found your custom input element again and can work inside it. The whole JavaScript file you need to add to your app now looks like this, in future we call it DoubleColorPickerInput.js:
// DoubleColorPicker Input Binding
//
// Definition of a Shiny InputBinding extension to
// get the values of two color pickers.
//
// https://github.com/zappingseb/customshinyinput
// Author: Sebastian Wolf
// License: MIT

// -----------------------------------------------------

// Create a shiny input binding
// Each custom input needs to be a shiny input binding
// that is defined by the JavaScript class "Shiny" and
// using the method "InputBinding"
// The name can be chosen, here it is "DoubleColorPickerBinding"
var DoubleColorPickerBinding = new Shiny.InputBinding();

// Extend the binding with the functions seen here
$.extend(DoubleColorPickerBinding, {

  // The scope defines how the element is described in HTML code
  // The best way to find the scope
  find: function(scope) {
    return $(scope).find(".doublecolorpicker");
  },
  getValue: function(el) {
   // todo
  },
  setValue: function(el, value) {
   // todo
  },
  subscribe: function(el, callback) {
    // todo
  },
  unsubscribe: function(el) {
    // todo
  }
});

// Registering the shiny input
//
// The following function call is used to tell shiny that
// there now is a new Shiny.InputBinding that it shall
// deal with and that it's functionality can be found in
// the variable "DoubleColorPickerBinding"
Shiny.inputBindings.register(DoubleColorPickerBinding);
view rawcustom_inputs_lessontwo.js hosted with ❤ by GitHub
Takeaway #5: Use the jQuery.find() function to get your element into the Shiny.InputBinding.
4 Know what your getValue function looks like
Here comes the hard part. We now want to access the value of our custom input and hand it over to R. Therefore we need to work on the getValue function inside the JavaScript file. This function basically returns the values of your custom input element into your shiny input variable.
The example I constructed makes it a bit harder than what you would expect. In this case we do not want to include just the value of one input element, but two. Therefore the best way to handle two values between JavaScript and R is the json-Format. It allows you to send dictionaries as well as arrays. Here we would like to get an array with dictionaries that tells us something like this: border_color=red, fill_color=blue. In JSON this would look like this
[
  {name:'border',
   color:'red'},
  {name:'fill',
   color:'blue'}
]
It means you get an array of two objects that both have the attributes name and the attributes color. We can do this now inside our getValue function by using some basic jQuery Tools.
getValue: function(el) {
  // create an empty output array
  var output = []

  // go over each input element inside the
  // defined InputBinding and add the ID
  // and the value as a dictionary to the output
  $(el).find("input").each(function(inputitem){

    output.push({
        name:   $(this).attr("id"),
        value:  $(this).val()
    });
  });

  // return the output as JSON
  return(JSON.stringify(output))

}
view rawcustom_inputs_lessonthree.js hosted with ❤ by GitHub
The functions you need to know are each, attrand val . These three functions allow you to iterate over your inputs (each), to derive their ID (attr) and to derive their value (val).
In the R Code of DoubleColorPickerInput.Rwe encoded the IDs an a way that they represent border color or for the fill color. The IDs make a good name by this encoding.
In case you want a more difficult input you might have to look up how to get the value of an element. It can be different than basically using the val function or you need a different find call. For example using a textarea input you cannot find it using the $(el).find('input') statement. You will have to use $(el).find('textarea') and also append the value of this element to your output array.
To make the output array readable in R you have to return it as a JSON string. Inside JavaScript the JSON.stringify function will do it for you.
Takeaway #6: Derive input element Values by jQuery.val()
Takeaway #7: Use JSON arrays to derive multiple input values
5 Know what your subscribe function looks like
Now we have a custom input using two color pickers and we are able to derive the value of this input. Next we need shiny to also react upon changes of this input. This is what is called subscribe.
There are two ways how you can subscribe to an input. The first one will use no rate policy, meaning you send everything that changes immediately to R. The second one can use a rate policy, meaning you wait a certain time for inputs to change and then send the values. The second one is really important for text input fields. In case somebody types a word, you do not want shiny to react upon each letter the person types, but on the whole word. Therefore you will need a rate policy. The rate policy is explained in detail inside the RStudio tutorial.
Here we would like our app to change on any color change we have in our DoubleColorPicker. As each element inside our DoubleColorPicker is an input, we can basically check for changes of those. Therefore jQuery contains a function that is called change that notices any change of the value of an element or changes of classes, too. Other candidates in jQuery for such change recognition of changes are: keyup , keydown , keypress .
Our subscription to the color pickers will look like this:
subscribe: function(el, callback) {
    // the jQuery "change" function allows you
    // to notice any change to your input elements
   $(el).on('change.input', function(event) {
     callback(false);
       // When called with false, it will NOT use the rate policy,
	  // so changes will be sent immediately
   });
  }
view rawcustom_inputs_lessonfour_part.js hosted with ❤ by GitHub
change.input seems like an easy thing to check on. But you might have more difficult inputs inside your shiny custom input element. Therefore I would recommend to give each of your custom inputs an additional class OR find out what is the class of your shiny-input. I built a shiny input out of shiny selectInput functions. They all have the class selectized . So you can make a subscribe function like that:
$(el).on('change.selectized', function(event) {
callback(false);
});
Instead of selectized you can insert your own class that you assign to each of your single elements. Assigning an own class like doublecolorpickerItem will also allow you to derive the values easier because you do not care for the type of your input element. The code of your app would look really different then, but you could do it and I recommend it. In case of this app here, it is not possible as shiny::textInput does not allow to set a custom class.
Though I prepared an example of such a complicated input for anyone who is interested as a Gist (Example of a difficult multi input custom input).
The whole JavaScript file now looks like that:
// DoubleColorPicker Input Binding
//
// Definition of a Shiny InputBinding extension to
// get the values of two color pickers.
//
// https://github.com/zappingseb/customshinyinput
// Author: Sebastian Wolf
// License: MIT

// -----------------------------------------------------

// Create a shiny input binding
// Each custom input needs to be a shiny input binding
// that is defined by the JavaScript class "Shiny" and
// using the method "InputBinding"
// The name can be chosen, here it is "DoubleColorPickerBinding"
var DoubleColorPickerBinding = new Shiny.InputBinding();

// Extend the binding with the functions seen here
$.extend(DoubleColorPickerBinding, {

  // The scope defines how the element is described in HTML code
  // The best way to find the scope
  find: function(scope) {
    return $(scope).find(".doublecolorpicker");
  },
  getValue: function(el) {
    // create an empty output array
    var output = []

    // go over each input element inside the
    // defined InputBinding and add the ID
    // and the value as a dictionary to the output
    $(el).find("input").each(function(inputitem){

      output.push({
          name:   $(this).attr("id"),
          value:  $(this).val()
      });
    });

    // return the output as JSON
    return(JSON.stringify(output))

  },
  setValue: function(el, value) {
   // todo
  },
  subscribe: function(el, callback) {
    // the jQuery "change" function allows you
    // to notice any change to your input elements
  	$(el).on('change.input', function(event) {
  	  callback(false);
  	});
  },
  unsubscribe: function(el) {
    $(el).off('.doublecolorpicker');
  }
});

// Registering the shiny input
//
// The following function call is used to tell shiny that
// there now is a new Shiny.InputBinding that it shall
// deal with and that it's functionality can be found in
// the variable "DoubleColorPickerBinding"
Shiny.inputBindings.register(DoubleColorPickerBinding);
view rawcustom_inputs_lessonfour.js hosted with ❤ by GitHub
it also contains an unsubscribe function, which you can always do in the same way using the off function.
Takeaway #8: Use the jQuery.change() function to derive changes of inputs.
Takeaway #9: Try to give each element inside your custom input a desired HTML/CSS class.
6 Know how to handle the input
Now we have a custom input that allows you to read two color pickers into one JSON string. This JSON string is available inside R by a shiny input. Additionally changes on one of the two colors will do a callback to shiny and inform it, that it has to react. We are finished with our custom input? No, we want it to come out of the JavaScript interaction not as a JSON string, but as a nice and readable list like:
[["fill"]]
"#f00000"
[["border"]]
"#00000f"
Therefore we need to add a registerInputHandlerfunction call to our shiny application. This will allow you to not only have a custom input, but also a custom value derived from your custom input. It needs two things in the setup.
- change the JavaScript file to allow it
- add the function call before your server.R is source
1 The first step is easy. You basically have to change the JavaScript functions to contain the following:
getType: function(el) {
    return "DoubleColorPickerBinding";
 }
Now shiny will know which type you defined for your custom input. To see the whole input binding now, look at this Github Gist (adding getType for InputBinding in shiny).
2 The second part is just coding a function to get a list out of a JSON string in R. This can be done by jsonlite easily. jsonlite will return a data.frame that you can parse into a list. All of this has to happen inside the registerInputHandlerfunction call. You can add this code snippet to the file where you defined the custom input and it will be sourced upon starting the app.
# Try to remove the input Handler as shiny does not allow double input
# handlers
try({ removeInputHandler("DoubleColorPickerBinding") })

# Use the shiny registerInputHandler function to
# register a way to deal with the inputs coming
shiny::registerInputHandler(
  "DoubleColorPickerBinding",
  function(x, shinysession, name) {

    if(is.null(x)) {
      return(x)

    } else {
      # Parse return value from JSON into R format dataframe
      colors_df <- jsonlite::fromJSON(x)

      # Extract the values of the data frame as a list
      res <- list()

      res[["fill"]] <- colors_df$value[
        which(grepl(colors_df$name,pattern="fill"))
        ]
      res[["border"]] <- colors_df$value[
        which(grepl(colors_df$name,pattern="border"))
        ]

      return(res)
    }
  }
)
view rawcustom_inputs_lessonfive.R hosted with ❤ by GitHub
Takeaway #10: Use registerInputHandler function to parse the response from your custom input over into something useful in R.
7 Don’t build reactive stuff about you input in R, do as much as possible in JavaScript
Actually, you are done with the application. Get the shiny Telephones by Region example and make sure your ui.R sources DoubleColorPicker.R and contains DoubleColorPickerInput("myid") inside your sidePanel . Additionally your ui.R should have
tags$head(
    tags$link(rel = "stylesheet", type = "text/css", href = "spectrum.css"),
    tags$script(src="spectrum.js"),
    tags$script(src="DoubleColorPickerInput.js")
)
in it to source the Javascript files. You can access the colors in your server.R by:
color_list <- input$myid
barplot(WorldPhones[,input$region]*1000,
            main=input$region,
            ylab="Number of Telephones",
            xlab="Year",
            col = color_list[["fill"]],,
            border = color_list[["border"]],
            lwd=3
 )
and receive this app:
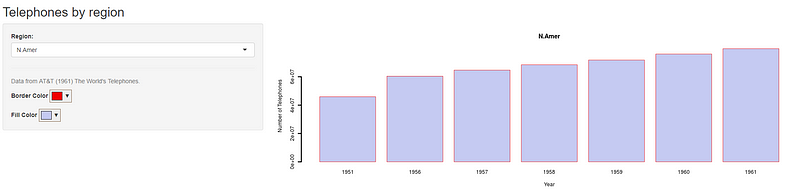 Final solution application
for the full example please see https://github.com/zappingseb/customshinyinput
At the beginning of this tutorial I told you about the one feature I want to have, that is easy to do in shiny, but you should not do it. It’s double checking if the two inserted colors are too close as e.g. red and dark red. This feature comes along with calculating something from your input, that does not change your R calls or R calculations, but your user interface. For example you want to give a warning upon the two colors being too close to each other. Of course you can do it in R, but this means the following:
Pick the color → check the value with the inputBinding → send it to shiny → use the inputHandler → run R code on it → change a shiny warning output
You can get this much faster using pure JavaScript
Pick the color → check the value → change a warning item
Of course the 5 step process via shiny runs fast and you wont’t notice any difficulties if you have one custom input, but upon having maybe 20 or 30 of those inputs, we noticed in our apps, that they get kind of slow. This could be due to our bad R code or our bad JavaScript code. But we have 5 places where we can do something wrong. The second way just has 3 places to do something wrong. Therefore whenever you want to do something simple with your custom input that does not influence R calculations, do it in JavaScript.
My solution for dealing with colors comparison came from a stackoverflow entry.
As the response we need a warning HTML item (class=’warning’) and a function call to check the item by its ID. Both can be setup in shiny. The warning shall not be shown at the beginning (display: none) and have red text (color:red). The function call shall check for changes of the item using the jQuery.change function.
HTML(glue("
  <script>
    $('#{id}').on('change',
       function(){{
         check_doublecolorpicker('{id}');
       }});
   </script>"
)),
HTML("
   <div class='warning'
     style='color:red;display:none'>
     Please choose more different colors
   </div>"
)
view rawcustom_inputs_lessonsix.R hosted with ❤ by GitHub
The function check_doublecolorpicker needs to be set up in JavaScript. You basically need a function that gets the two color values, calculates the closeness and changes a warning HTML item. For calculating the closeness hexColorDelta was found in the stackoverflow entry and the rest is using the jQuery.val function as we did before. The jQuery.hide and jQuery.show function allow you to change the display property of your warning item. You have to use .warning as it’s class is warning and the . operator of CSS allows you to access class elements.
// Function to check a doublecolorpicker
// item by id
function check_doublecolorpicker(id){

  // derive an empty array of two inputs with
  // colors
  values = [];

  // push the two colors into the array
  $("#"+id).find('input').each(function(item){

    values.push($(this).val());

  });

  // derive the closeness of the two colors
  // delete the # sign by substring(1)
  closeness = hexColorDelta(values[0].substring(1),values[1].substring(1));

  // If the colros are too close, show a warning inside the
  // id element
  if(closeness>0.8){
    $('#'+id + ' div.warning').show();
  }else{
    $('#'+id + ' div.warning').hide();
  }
}
view rawcustom_inputs_lessonsix.js hosted with ❤ by GitHub
I know if your programming a lot in R and especially in R-Shiny, this does not suite you. The code in JavaScript looks different from code in R. But as I explained before, it may save you time and troubles. The outcome message will now show up in your app as this and we are done. 🙂
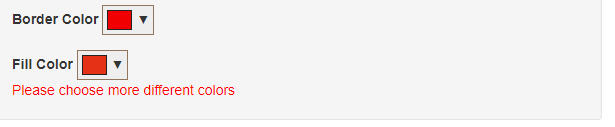 Warning message upon inserting two equal colors
Takeaway #11: JavaScript can save you calculation steps in your user interface
Summary
In summary I have to say that my blog post shall be named “7 steps to get custom inputs in shiny as easy as possible”. It is not easy to insert a custom input element into R-Shiny. It seems nearly impossible if you do not understand any JavaScipt. This tutorial should allow you to go through building up a new R-Shiny input by 7 steps. If you follow the 7 steps and do not forget to check one, you will succeed in building up new user interface elements. Those new elements will allow your users to insert something into your app they never thought about. We enabled things like a drag&drop input, an input to rearrange a bunch of plots on a grid, fancier check boxes, on-off switches, anything you can imagine. You can read whole books on fancy inputs or check websites like https://bootsnipp.com/ or https://freefrontend.com.
The main reason for such custom inputs shall be your user requirements. Of course you can put them into your app just to learn some JavaScript, but I don’t know if your boss will like it. But whenever your customer comes to you and shows you a website and says: “Can we get this feature into the app?”, now you should be able to answer: “Yes we can!”
Takeaways
- Search for jQuery based tools that provide HTML tutorials
- Try to use Shiny Input Elements inside your custom elements.
- Do not forget to source the JavaScript and CSS files of your custom element.
- Put a div container around your element and give it a special class.
- Use the jQuery.find() function to get your element into the Shiny.InputBinding.
- Derive input element Values by jQuery.val()
- Use JSON arrays to derive multiple input values
- Use the jQuery.change() function to derive changes of inputs.
- Try to give each element inside your custom input a desired HTML class.
- Use registerInputHandler function to parse the response from your custom input over into something useful in R.
- JavaScript can save you calculation steps in your user interface